leap中profile的概念和使用
前言
今天用leap开发rest api应用的时候,遇到了一个问题,问题是这样的,我的api开发完成之后,需要把这个应用部署到服务器上,因为api需要连接数据库,所以部署之后就需要改一下配置,连接到运行时的数据库,但是我本地开发的时候,要连接到自己的数据库,这样就很麻烦了,因为api是协作开发的,每个人都有自己本地的数据库每个人的数据库IP和端口都可能不一样,而且运行时又有不同的数据库,每次在本地改完配置还得注意不能提交,部署之后还得注意把配置改过来。
相信这个问题很多协作开发的团队都遇到过,虽然感觉改配置不麻烦,但是却很容易遗漏,让这个部署运行不流畅,其实这个问题在leap中已经给出了一个简单的解决方案了。
profile的概念
profile的概念其实在很多地方都有的,不同的地方也有不同的概念,这里leap参考了maven中profile的概念,这个概念就是环境,下面对常见的几个环境简单解释一下:
- 生产环境(prod):指的是应用真正部署运行,给用户使用的环境,这个环境可能比较单一和固定
- 开发环境(dev):指的是程序在开发的时候使用的环境,这个环境多种多样,每个开发人员都可能不一样
- 测试环境(test):指的是对 应用做测试的环境,这个环境也比较单一和固定
这三个环境之间有一定的相互关系,正常情况下,应用在开发环境开发到一定阶段就会打包部署到测试环境给测试人员进行测试,这个过程可能需要修改配置然后打包,部署,然后再把配置改回来继续开发。测试通过之后,再需要修改配置成生产环境,然后打包部署,然后把配置改回来,然后继续开发。
maven对profile的处理
maven其实可以在pom.xml中配置几个指定的profile,然后运行maven指令打包的时候指定profile,对应的profile即可激活生效,指定profile的方式就是通过-P{profile}来指定的,比如:
1
mvn package -Pdev
假设我们这里有如下的pom.xml文件(参考自leap的demo-profile工程):
1
2
3
4
5
6
7
8
9
10
11
12
13
14
15
16
17
18
19
20
21
22
23
24
25
26
27
28
29
30
31
32
33
34
35
36
37
38
39
40
41
42
43
44
45
46
47
48
49
50
51
52
53
54
55
56
57
58
59
60
61
62
63
64
65
66
67
68
69
70
71
72
73
74
75
76
77
78
79
80
81
82
83
84
85
86
87
88
89
90
91
92
93
94
95
96
97
98
99
100
101
102
103
104
105
106
107
108
109
110
111
112
113
114
115
116
117
118
119
120
121
122
123
124
125
126
127
128
129
130
131
132
133
134
135
136
137
138
139
140
141
142
143
144
145
146
147
148
149
150
151
152
153
154
<project xmlns="http://maven.apache.org/POM/4.0.0" xmlns:xsi="http://www.w3.org/2001/XMLSchema-instance" xsi:schemaLocation="http://maven.apache.org/POM/4.0.0 http://maven.apache.org/xsd/maven-4.0.0.xsd">
	<modelVersion>4.0.0</modelVersion>
	<parent>
		<groupId>org.leapframework</groupId>
		<artifactId>leap-parent</artifactId>
		<version>0.3.0-SNAPSHOT</version>
		<relativePath>../../pom.xml</relativePath>
	</parent>
	<artifactId>demo-profile</artifactId>
	<packaging>jar</packaging>

    <profiles>

        <profile>
            <id>dev</id>
            <properties>
                <app.profile>dev</app.profile>
            </properties>
            <build>
                <filters>
                    <filter>src/main/resources/profile</filter>
                </filters>
                <resources>
                    <resource>
                        <directory>src/main/resources</directory>
                        <excludes>
                            <exclude>**/*.java</exclude>
                            <exclude>conf_*/</exclude>
                            <exclude>profile_local</exclude>
                        </excludes>
                        <filtering>true</filtering>
                    </resource>
                    <resource>
                        <directory>src/main/resources</directory>
                        <includes>
                            <include>conf_${app.profile}/</include>
                        </includes>
                    </resource>
                </resources>
            </build>
        </profile>

        <profile>
            <id>test</id>
            <properties>
                <app.profile>test</app.profile>
            </properties>
            <build>
                <filters>
                    <filter>src/main/resources/profile</filter>
                </filters>
                <resources>
                    <resource>
                        <directory>src/main/resources</directory>
                        <excludes>
                            <exclude>**/*.java</exclude>
                            <exclude>conf_*/</exclude>
                            <exclude>profile_local</exclude>
                        </excludes>
                        <filtering>true</filtering>
                    </resource>
                    <resource>
                        <directory>src/main/resources</directory>
                        <includes>
                            <include>conf_${app.profile}/</include>
                        </includes>
                    </resource>
                </resources>
            </build>
        </profile>

        <!-- for default package -->
        <profile>
            <id>prod</id>
            <build>
                <filters>
                    <filter>src/main/resources/profile</filter>
                </filters>
                <resources>
                    <resource>
                        <directory>src/main/resources</directory>
                        <excludes>
                            <exclude>**/*.java</exclude>
                            <exclude>conf_*/</exclude>
                            <exclude>profile_local</exclude>
                        </excludes>
                        <filtering>true</filtering>
                    </resource>
                </resources>
                <testResources>
                    <testResource>
                        <directory>src/test/resources</directory>
                        <excludes>
                            <exclude>**/*.java</exclude>
                        </excludes>
                    </testResource>
                </testResources>
            </build>
        </profile>

        <!-- for default compile or running test case, don't need to activate it explicitly -->
        <profile>
            <id>default_for_compile_only</id>
            <build>
                <resources>
                    <resource>
                        <directory>src/main/resources</directory>
                        <excludes>
                            <exclude>**/*.java</exclude>
                        </excludes>
                    </resource>
                </resources>
                <testResources>
                    <testResource>
                        <directory>src/test/resources</directory>
                        <excludes>
                            <exclude>**/*.java</exclude>
                        </excludes>
                    </testResource>
                </testResources>
            </build>
            <activation>
                <activeByDefault>true</activeByDefault>
            </activation>
        </profile>
    </profiles>

    <build>

    </build>

    <properties>
        <maven.javadoc.skip>true</maven.javadoc.skip>
        <maven.package.skip>true</maven.package.skip>
        <maven.deploy.skip>true</maven.deploy.skip>
        <maven.install.skip>true</maven.install.skip>
    </properties>

    <dependencies>
		<dependency>
			<groupId>org.leapframework</groupId>
			<artifactId>leap-core</artifactId>
			<version>${project.version}</version>
		</dependency>

        <dependency>
            <groupId>org.leapframework</groupId>
            <artifactId>leap-junit</artifactId>
            <version>${project.version}</version>
            <scope>test</scope>
        </dependency>
    </dependencies>
</project>
这里我们只关注profile这一段配置,这里我们一共看到4个profile:
- dev
- test
- prod
- default_for_compile_only
其中default_for_compile_only这个profile是用于默认编译的,先忽略,我们看另外三个profile。
以dev为例:
1
2
3
4
5
6
7
8
9
10
11
12
13
14
15
16
17
18
19
20
21
22
23
24
25
26
27
28
<profile>
    <id>dev</id>
    <properties>
        <app.profile>dev</app.profile>
    </properties>
    <build>
        <filters>
            <filter>src/main/resources/profile</filter>
        </filters>
        <resources>
            <resource>
                <directory>src/main/resources</directory>
                <excludes>
                    <exclude>**/*.java</exclude>
                    <exclude>conf_*/</exclude>
                    <exclude>profile_local</exclude>
                </excludes>
                <filtering>true</filtering>
            </resource>
            <resource>
                <directory>src/main/resources</directory>
                <includes>
                    <include>conf_${app.profile}/</include>
                </includes>
            </resource>
        </resources>
    </build>
</profile>
可以看到,当profile为dev时,打包会将conf_*的文件和profile_local的文件忽略掉,同时将指定的profile下的文件包含进来,也就是说会把conf_dev文件夹包含进来。
假设有如下maven工程:
1
2
3
4
5
6
7
8
9
project
  ┣  src/main/java
  ┗  src/main/resources
        ┣    conf
        ┃      ┗ config.xml
        ┣    conf_dev
        ┃      ┗ beans.xml
        ┗    conf_test
                ┗ beans.xml
运行maven指令mvn package -Pdev,打包结果如下:
1
2
3
4
5
6
project
  ┗  classes
        ┣    conf
        ┃      ┗ config.xml
        ┗    conf_dev
                ┗ beans.xml
这里我们可以看到,maven已经帮我们把conf_test的内容排除出去了。
但是实际上,maven虽然打包有这个特性支持,但是实际使用起来还是相当麻烦的,开发的过程同时维护三套环境的配置也是非常痛苦的。
比如当我需要在配置中加一个属性的时候,需要同时在三套配置环境中保持同步,并且需要其他所有协同开发的同事都更新这三套配置,另外,maven的生命周期并不包含开发过程,所以即使配置了三套环境,也没办法在开发的时候指定使用哪个profile,所以对于开发人员来说,多套环境的配置依然是痛苦的。
为了解决开发人员的这种痛苦,leap对maven的这个特性做了更好的支持。
leap对profile的支持
通过maven的配置,打包过程的多环境支持我们已经解决了,那么在开发的过程,如何支持多环境配置呢?
我们先看一下leap标准的多环境配置目录结构:
1
2
3
4
5
6
7
8
9
10
11
12
13
14
15
16
17
18
19
20
21
22
23
24
25
26
27
28
29
leap
  ┣━ src
  ┃   ┣━ main
  ┃   ┃    ┣━ java
  ┃   ┃    ┃    ┗━ app
  ┃   ┃    ┃        ┗━ test
  ┃   ┃    ┃            ┣━ Global.java
  ┃   ┃    ┃            ┗━ controller
  ┃   ┃    ┃                   ┗━ HomeController.java
  ┃   ┃    ┣━ resources
  ┃   ┃    ┃     ┣━ conf
  ┃   ┃    ┃     ┃   ┣━ beans.xml
  ┃   ┃    ┃     ┃   ┗━ config.xml
  ┃   ┃    ┃     ┣━ conf_dev
  ┃   ┃    ┃     ┃   ┗━ config.xml
  ┃   ┃    ┃     ┣━ conf_test
  ┃   ┃    ┃     ┃   ┗━ config.xml
  ┃   ┃    ┃     ┣━ conf_prod
  ┃   ┃    ┃     ┃   ┗━ config.xml
  ┃   ┃    ┃     ┗━ profile
  ┃   ┃    ┗━ webapp
  ┃   ┃         ┗━ WEB-INF
  ┃   ┃              ┣━ views
  ┃   ┃              ┃    ┗━ index.html
  ┃   ┃              ┗━ web.xml
  ┃   ┗━ test
  ┃        ┣━ java
  ┃        ┗━ resources
  ┗━ pom.xml
这里我们可以看到,跟leap的标准工程结构相比,多了两个文件profile和profile_local,还有三个目录conf_dev、conf_test、conf_prod。
对应的,pom.xml中也会多出关于profile的配置:
1
2
3
4
5
6
7
8
9
10
11
12
13
14
15
16
17
18
19
20
21
22
23
24
25
26
27
28
29
30
31
32
33
34
35
36
37
38
39
40
41
42
43
44
45
46
47
48
49
50
51
52
53
54
55
56
57
58
59
60
61
62
63
64
65
66
67
68
69
70
71
72
73
74
75
76
77
78
79
80
81
82
83
84
85
86
87
88
89
90
91
92
93
94
95
96
97
98
99
100
101
102
103
104
105
106
107
108
109
110
111
112
113
114
<profiles>

    <profile>
        <id>dev</id>
        <properties>
            <app.profile>dev</app.profile>
        </properties>
        <build>
            <filters>
                <filter>src/main/resources/profile</filter>
            </filters>
            <resources>
                <resource>
                    <directory>src/main/resources</directory>
                    <excludes>
                        <exclude>**/*.java</exclude>
                        <exclude>conf_*/</exclude>
                        <exclude>profile_local</exclude>
                    </excludes>
                    <filtering>true</filtering>
                </resource>
                <resource>
                    <directory>src/main/resources</directory>
                    <includes>
                        <include>conf_${app.profile}/</include>
                    </includes>
                </resource>
            </resources>
        </build>
    </profile>

    <profile>
        <id>test</id>
        <properties>
            <app.profile>test</app.profile>
        </properties>
        <build>
            <filters>
                <filter>src/main/resources/profile</filter>
            </filters>
            <resources>
                <resource>
                    <directory>src/main/resources</directory>
                    <excludes>
                        <exclude>**/*.java</exclude>
                        <exclude>conf_*/</exclude>
                        <exclude>profile_local</exclude>
                    </excludes>
                    <filtering>true</filtering>
                </resource>
                <resource>
                    <directory>src/main/resources</directory>
                    <includes>
                        <include>conf_${app.profile}/</include>
                    </includes>
                </resource>
            </resources>
        </build>
    </profile>

    <!-- for default package -->
    <profile>
        <id>prod</id>
        <build>
            <filters>
                <filter>src/main/resources/profile</filter>
            </filters>
            <resources>
                <resource>
                    <directory>src/main/resources</directory>
                    <excludes>
                        <exclude>**/*.java</exclude>
                        <exclude>conf_*/</exclude>
                        <exclude>profile_local</exclude>
                    </excludes>
                </resource>
            </resources>
            <testResources>
                <testResource>
                    <directory>src/test/resources</directory>
                    <excludes>
                        <exclude>**/*.java</exclude>
                    </excludes>
                </testResource>
            </testResources>
        </build>
    </profile>

    <!-- for default compile or running test case, don't need to activate it explicitly -->
    <profile>
        <id>default_for_compile_only</id>
        <build>
            <resources>
                <resource>
                    <directory>src/main/resources</directory>
                    <excludes>
                        <exclude>**/*.java</exclude>
                    </excludes>
                </resource>
            </resources>
            <testResources>
                <testResource>
                    <directory>src/test/resources</directory>
                    <excludes>
                        <exclude>**/*.java</exclude>
                    </excludes>
                </testResource>
            </testResources>
        </build>
        <activation>
            <activeByDefault>true</activeByDefault>
        </activation>
    </profile>
</profiles>
这部分配置跟之前的配置基本是一样的,应该说,绝大部分的多环境配置都是相同的,可以直接拷贝这份配置使用。
接下来我们看这个profile文件:
1
${app.profile}
这里是一个占位符,也就是说,我们可以通过运行参数动态指定运行时使用的profile。
现在我们以Intellij idea为例,讲解如何在开发环境的tomcat中使用profile。
在idea中导入上面的工程之后,部署到tomcat运行起来,可以看到控制台中打印的日志:
1
   *** app profile : prod ***
这表明leap默认检测到的profile是prod环境,因为我们没有指定profile,指定profile的过程只需要设置app.profile这变量即可,我们可以在tomcat的配置jvm启动参数中,添加如下参数:
1
-Dapp.profile=dev
如下图:
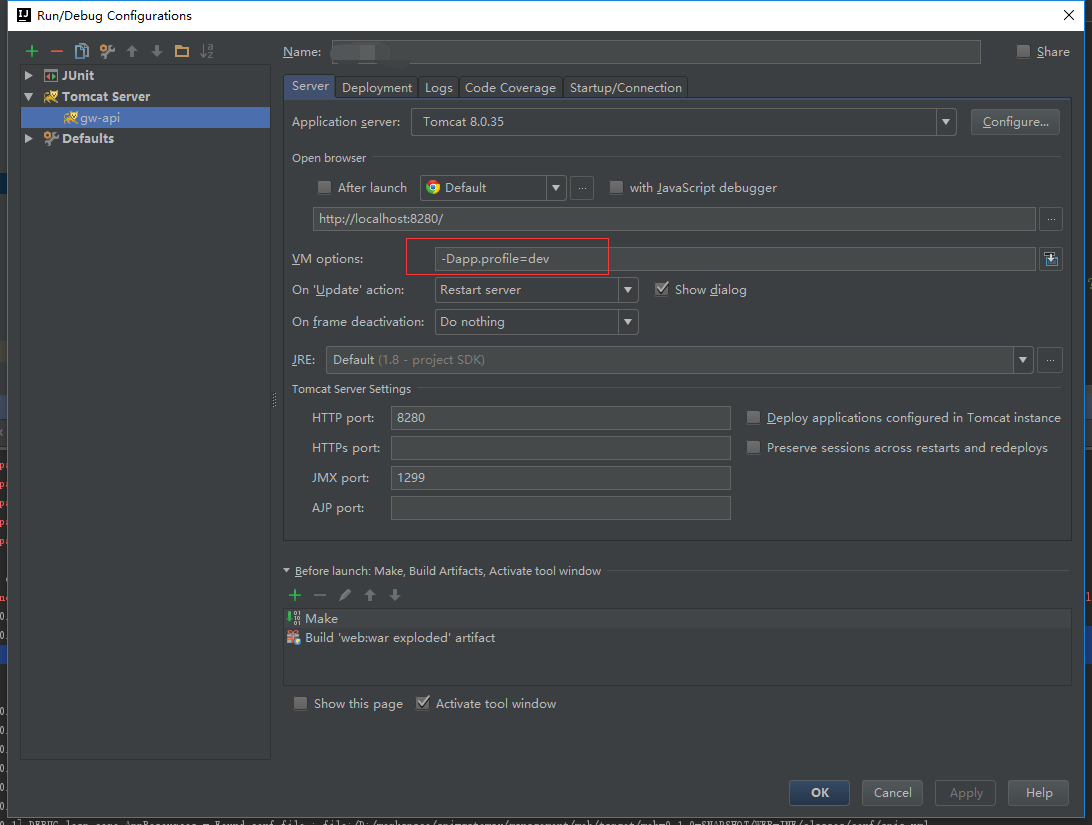
再次启动tomcat,可以看到控制台打出如下日志:
1
*** app profile : dev ***
这表明leap已经使用了dev环境的配置了。
接下来我们来看leap如何解决同时维护多套环境的配置问题。
我们先看下conf/config.xml的配置:
1
2
3
4
5
6
7
8
9
10
11
<config xmlns="http://www.leapframework.org/schema/config"
        xmlns:orm="http://www.leapframework.org/schema/orm/config"
        xmlns:web="http://www.leapframework.org/schema/web/config">
    <base-package>app.leap</base-package>
    <properties>
        <property name="db.driverClassName">org.h2.Driver</property>
        <property name="db.url">jdbc:h2:./target/prod;DB_CLOSE_ON_EXIT=FALSE</property>
        <property name="db.username">sa</property>
        <property name="db.password"></property>
    </properties>
</config>
这里我们看到配置了数据库驱动,连接,用户名和密码等。
然后我们在看一下conf_dev/config.xml的配置:
1
2
3
4
5
6
7
8
9
10
<?xml version="1.0" encoding="utf-8"?>
<config xmlns="http://www.leapframework.org/schema/config"
        xmlns:orm="http://www.leapframework.org/schema/orm/config"
        xmlns:web="http://www.leapframework.org/schema/web/config">
    <properties>
        <property name="db.url" override="true">
            jdbc:h2:./target/dev;DB_CLOSE_ON_EXIT=FALSE
        </property>
    </properties>
</config>
这里我们可以看到,只配置了db.url属性,并且指定了属性的override="true"也就是说这个属性会覆盖主配置的db.url,看到这里我们应该已经明白了,leap解决多环境配置的方式,采用了主副配置的概念。
主配置都在conf目录下,这个配置是所有环境共享的,也就是说我们需要添加一个统一的配置的时候,只要在conf目录下的配置添加即可,所有环境都会包含这属性,只有当某个配置是不同环境有变化的,我们才需要在指定的profile中配置。
另外,我们可以在不同环境添加不同的配置,比如test环境包含一个特殊的变量,那就在conf_test/config.xml中添加即可,其他环境不受这个属性影响,如果需要覆盖主配置的配置,只要添加override="true"即可。